Save Time And Frustration With These Expert Installation Tips For Wall-Mounting Your TV

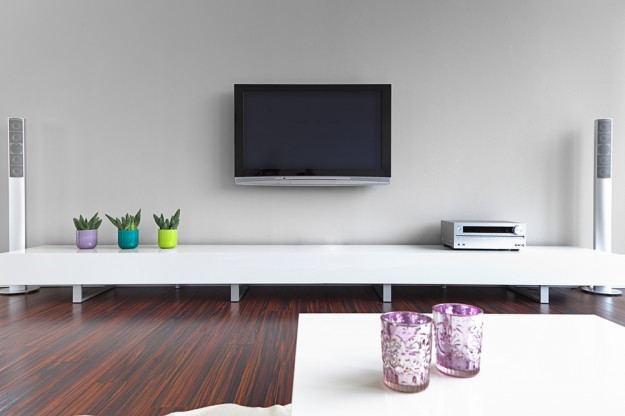
Mounting a TV on the wall makes a lot of sense for most people, as it frees up space in the home and, generally speaking, is a practical move. But, for some, the practice of mounting a TV on the wall can be intimidating.
Mounting a TV can be a quick & easy task, but it can very easily turn into an arduous journey. In essence, the process involves putting 4 bolts in the wall to hold a bracket. You then hang the TV on that bracket and, voilà, you’re done. Sounds simple, right? But putting 4 bolts into a wall isn’t always as simple as it may sound.
To help you out, we’ve put together a list of expert tips in hopes of helping you avoid certain mistakes and overcome some of common obstacles presented when mounting a TV.
Your stud finder is a liar
Stud finders are tricky little tools. They can be one of the most helpful tools in the box, or the reason you put 10 holes in the wall without hitting a stud. Simply put, they’re liars. But here are 4 tips that help ensure they never trick you again.
- Go slow – Stud finders need to be properly calibrated in order to be effective. First, place it on the wall and enable it (often by holding in a button). Let the stud finder read the density of the material (this will only take a second or two), then slowly move it from side to side. Go back and forth over the wall a few times, starting from a different spot each time. Mark each stud with a piece of painter’s tape. We generally recommend finding 3 studs, and using a tape measure to make sure they are the same distance apart.(16 inches almost always) This will help you avoid false positives.
- Popcorn ceilings defeated – Have you ever tried to run a stud finder across a ceiling with popcorn texturing? Not only do you ruin the texture, the stud finder doesn’t work well. An easy way to overcome this problem is to place a piece of cardboard over the area you want to scan. The cardboard gives the stud finder a smooth surface to slide across and will allow you to easily find the joists.
- Don’t forget fire blocks – Before drilling any holes, run your stud finder vertically up and down the wall to ensure there are no fire blocks running horizontally between the stud bays. Fire blocks can make fishing wires down the wall very difficult, even for experienced installers.
- Always double check – Stud finders can be fooled fairly easily. For example, they will often read a seam in the drywall as a stud. After you have marked your studs and where you want to drill your holes, you should use something to poke into the wall to ensure you actually marked a stud. We normally use a small precision screwdriver, but a cut-off coat hanger or piano wire will work fine. We would recommend doing this by hand, rather than using a power tool, as you will have a better feel for what’s inside the wall. Second, you should poke a little hole to the left and right of where you want to drill and make sure you are still on the stud. This will ensure you are centered on a stud, and not just clipping the side (and possibly hitting something electrical).
- Just to add about stud finders, the best stud finder is a very strong magnet. This has never failed us in finding a stud. http://www.amazon.ca/CH-Hanson-03040-Magnetic-Finder/dp/B000IKK0OI
We’re doomed, the studs are in the wrong spot … or there aren’t any
You found the perfect spot to mount a TV in your home. You have read all of our tips on using a stud finder, and are ready to go. But after twenty minutes of scanning for studs you can’t find any, or the results are inconsistent, or they don’t line up with the holes on your wall mount. You might be surprised how often this happens, but luckily there are a number of solutions that don’t require much, if any, extra work.
- Take off covers – If you can’t locate the studs with a stud finder, locate an outlet on the wall (or any other fixture, like a cold air return). All outlets are attached to a stud, unless they were added after the wall was up (not common). By taking off the wall plate, you can stick a thin tool into the gap between the side of the electrical box and the drywall, and then feel which side the stud is on. From there, measure over 16” and you should find another stud. Keep going over 16” until you are in the area where you want to mount the TV. Then use a small tool to poke a hole in the wall to see if a stud is actually there.
- Make your own holes – What if you found studs, but they don’t lineup with the holes on your bracket? Easy: make extra holes on the wall bracket. The best way to do this is to use a stepped drill bit and a powerful drill. A good stepped drill bit will quickly cut through a steel wall mount.
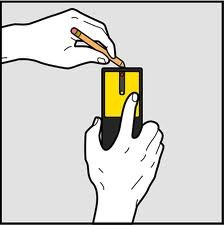
- Use of Inspection camera. Drill a ½’’ hole and insert the camera head to understand better the inside of your drywall.

Using a inspection camera to help mounting a TV on the wall
- Use a toggle(Toggler 1/4 recommended) – If there simply aren’t any studs where you want to mount the TV, then you need to use some sort of hollow wall anchor. These can be extremely strong, but as a general rule should not be used with full-motion, or articulating, mounts. The ¼” SNAPTOGGLE is hands down the best hollow wall anchor on the market, and they can comfortably hold new 55” TVs on a single sheet of drywall. Remember to at least use 4-6 of them depending on the weight. I would suggest to not hang anything more than 55lbs if you are just using togglers. As an experiences TV wall mount installer/Home Theater installer we use toggles in condos where there are metal studs. We drill through the Metal studs so that the bolts are gripped not only to the drywall but also the metal studs. if at least two of the toggles are in the metal studs.
Please, hide ALL of the cords in the wall

Nothing ruins the look of a nice TV mounted on the wall quicker than a tangle of exposed wires. Luckily, hiding cables inside the wall is fairly cheap and easy. The simplest way to achieve this is with a Concealed Cable Kit (CCK) or a list of them here. These kits come with everything you need to run power up to your TV and hide all of your signal wires as well (some even come with a cutting tool). You might be thinking: “Why not just drop an extension cord in the wall instead of installing an outlet?” Well, it’s actually against Ontario Electrical Safety Code to drop a power cord, or extension cord, inside the wall. It’s also not legal to put low-voltage cables, like HDMI, inside the wall if they are not rated for it.
A CCK is exactly like it sounds, an extension cord that is rated to go inside the wall. In the end, you will have an outlet behind your TV, and what’s called an inlet, down by the floor (at the same height as your other outlets). In order to provide power to the kit, you connect an extension cord from an existing outlet to the inlet.
Before you begin installation, ensure your low-voltage cables are rated for in-wall use. The next thing to know about CCK kits is that they come with a pre-determined length of electrical wire, typically 6feet. Also note that they should only be used in a single stud bay, and they are not designated for use above a fireplace. Of course, these limitations can be overcome or ignored, but we don’t recommend bending the rules. If you can’t hide cables inside the wall, then try installing paintable wire channel. Most of these simply stick/screwed to the wall, and allow you to hide all of your cables inside, providing for a clean look. Just know that when you remove the wire channel you will likely also remove the paint.
Maybe if I pull harder the cable will reach
Always buy longer cables than your think you need. This is the single most often ignored piece of advice we give people. It doesn’t matter if your TV is going on a wall or sitting on a stand, buy longer cables than you think you need. Extra wire can be wrapped up, stuffed in a wall, or otherwise hidden. If the cables are too short you risk them falling out, simply not reaching, breaking, or worse yet, damaging your equipment. For a typical flat panel installation, with a tilting wall mount and equipment located directly below the TV, 8’ cables will work nicely. 12’ cables will allow you to make connections before the TV is on the wall, or pull out the equipment once it is hooked up. If you are mounting a TV higher up than normal (average has the bottom of the TV between 36”-46” off the floor), or using a full-motion mount, you will need 12-foot cabling. If that seems excessive, consider this: on a typical full-motion mount with a 20-inch arm, you will use 3-4 feet of cable before even reaching the wall; that is, if it’s properly routed to allow safe movement of the TV on the arm. A final note on cables is that you should try to avoid those with bulky connectors. These types of cables might not fit properly behind a slim LED or even plug in. for that matter.
Wait, that doesn’t look level
Everything is cut, drilled, assembled, tightened, and otherwise wrapped up. You step back to take a look at your beautiful newly wall mounted TV, but something isn’t right. The TV isn’t level. What do you do? Do you need to pull it down? Drill new holes in the wall? Start over? Probably none of the above. There is almost always a way to level an un-level TV. Just know that sometimes a TV will never look level if the ceiling, floor, or mantle isn’t level. Check these other areas before you go mad trying to level the TV.
- Put your back into it – Literally walk up to the TV as it hangs on the wall, grab onto the sides, and then try to force it into being level. The success of this depends on how much you snugged down the bolts that hold the wall mount arms on the back of the TV. If they aren’t over tightened, you should have a little bit of wiggle room to help level the TV. As a side note, if you do this and the TV comes off the wall, you did something wrong… So, be careful.
- Loosen, push, tighten – Take the TV off the wall, loosen the bolts holding the arms on the back of the TV, then push up/down on the arms as you tighten them back down. Put the TV back on the wall and see if it’s level. If it isn’t, then do the same thing with the wall plate.
- Improvise – If you used up all of the wiggle room available and it still isn’t level, make more wiggle room. You can use the stepped drill bit we talked about earlier to round out the holes in the arms or wall plate. This may give you the little extra space needed, just don’t go too crazy and make the holes unusable. If you accidentally make the holes too big so the bolts slip through, you can always buy larger washers.
Conclusion
All of the tips listed come from years of firsthand experience mounting hundreds of TVs on wood studs, steel studs, plaster, brick, from the ceiling, above a fireplace, you name it. Some of them are common sense, but almost none will be found in an instruction manual. If you have the right tools, a few hours available, and patience, then you might try mounting your own TV. If not, you could always hire a professional. A simple wall mount (tilting mount, drywall with wooden studs, exposed wiring) might only take a professional about 40 minutes from un-boxing to finished install. However, a novice should plan to read the instructions, proceed cautiously, and free up an afternoon. It’s never fun to break a TV. If you liked any of the tips above, or have some of your own, let us know in the comments below.
Help from Digital Trends article
- Use a toggle(Toggler 1/4 recommended) – If there simply aren’t any studs where you want to mount the TV, then you need to use some sort of hollow wall anchor. These can be extremely strong, but as a general rule should not be used with full-motion, or articulating, mounts. The ¼” SNAPTOGGLE is hands down the best hollow wall anchor on the market, and they can comfortably hold new 55” TVs on a single sheet of drywall. Remember to at least use 4-6 of them depending on the weight. I would suggest to not hang anything more than 55lbs if you are just using togglers. As an experiences TV wall mount installer/Home Theater installer we use toggles in condos where there are metal studs. We drill through the Metal studs so that the bolts are gripped not only to the drywall but also the metal studs. if at least two of the toggles are in the metal studs.